ITH calculator
INSTALLATION INSTRUCTIONS FOR ALL SORMAT ITH MASSES
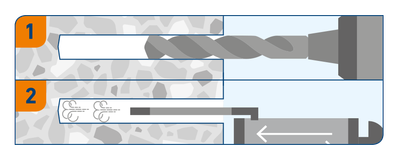
Drill and Clean the Hole
Select a drill with a diameter that matches the anchor rod in question. Drill to the minimum installation depth, hnom.
If the drill hole is not cleaned properly, the performance of the injection resin can be halved! Primarily use a brush intended for the purpose and an air pump. You can also use a straw, a bottle brush, or blow a few times with compressed air.
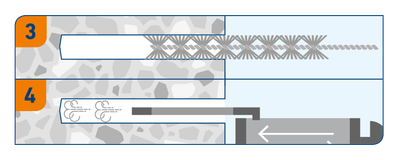
Brush and Blow Out
Brush the hole and blow it out thoroughly using appropriate tools to prepare for resin insertion.

Test the Cartridge
Install the ITH cartridge in the gun and screw the mixing nozzle, which comes with the cartridge, in place. For 165 ml and 300 ml cartridges, a good quality standard silicone gun is sufficient. Try to squeeze out about 10 cm and make sure that the two differently colored components have completely mixed in the nozzle.

Fill with Resin
Fill the hole to 2/3 with resin. If you have made several holes, fill at most a couple of holes at a time so that the resin does not harden before you have had time to screw in the anchor rod.
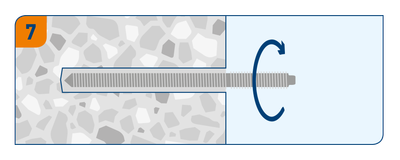
Install by Rotating
Always install the anchor rod by rotating it into the resin. The rotation ensures that the resin penetrates everywhere in the threads of the anchor rod and makes the attachment strong. Do not wipe off the protruding resin when it is wet to avoid unnecessary mess on the threads of the anchor rod.
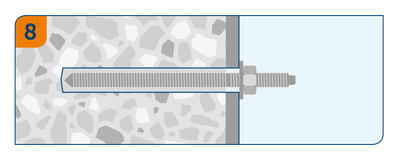
Wait for Curing
Indoors and at normal room temperature, the resin usually begins to harden within a few minutes. The product-specific details are always on the side of the Sormat ITH cartridge. Wait until the resin has hardened and then remove the excess resin with a hammer and, for example, a flat screwdriver.
Repeat if Needed
The entire cartridge does not need to be used at once. By leaving the nozzle in place, you can replace the cap between uses and keep the mass in usable condition. When you use the resin next time, put a new nozzle in place, make sure again that the mass mixes, see point 3.
ITH 300 Ve
Hi-performance vinylester injection resin 300 ml for cracked concrete
ITH 410 Ve
Hi-performance vinylester injection resin 410 ml for cracked concrete
ITH 410 Wi
Vinylester injection resin 410 ml for use in cold winter conditions
ITH 300 Wi
Vinylester injection resin 300 ml for use in cold winter conditions